Category Archives: Food for eating
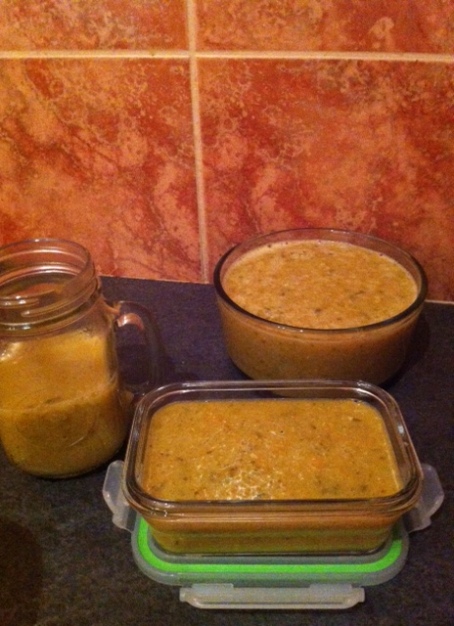
Happy New Year and B&B’s Curry-ginger Vegetable Soup
It’s still January, so I think that means that it’s still ok for me to wish you a Happy New Year. Hope you all enjoyed the holidays and have found your way back to your routines.
I have made this recipe a few times over the last few months and J and I have really enjoyed it! It’s the perfect soup for cold January weather – and is also super healthy, so great for keeping new year’s resolutions! It came together one night before we were travelling when I was trying to figure out how to use to broccoli and bok choy that were left in my fridge. I found this soup recipe, and changed it to add some spices, some lentils and some other veggies. The result was awesome! I’ve been meaning to share it with you for a while. Here is the recipe:
*Also, you’re going to have to forgive my laziness with picture taking lately. I do intend to get back to my SLR soon!
B&B’s Curry-Ginger Vegetable Soup
- Sauté onion and three cloves of chopped garlic in grape seed oil for about ten minutes.
- Add the broccoli, bok choy, lentils and carrots and sauté for another 5 minutes.
- Add broth and curry, ginger, cumin and turmeric.
- Bring to a boil and simmer for about 30 minutes or until the broccoli and bok choy are tender.
- Salt and pepper to taste.
- Just before it is finished add one chopped clove of garlic.
- Puree and then add lemon juice.
Enjoy!
Stuffed butternut squash
A couple of weeks ago, I mentioned a delicious stuffed butternut squash dish. I also promised to share the recipe. This meal is very easy and filling, but the prep is a little long, so I recommend making this when you are in the mood for a slow evening. It is perfect for a dinner party and is also meatless – so an excellent vegetarian dinner idea! Tip: To shorten the prep, make the quinoa ahead of time!
Stuffed butternut squash
Ingredients
- 1 medium butternut squash
- olive oil
- pinch dried oregano
- 1 cup quinoa (cooked) (this will take about 20 mins to cook – make sure to budget this into your time!)
- 1 small carrot , grated
- juice of 1 lemon
- 1 box of cherry or grape tomatoes, chopped in half
- 1 onion, chopped
- 1 red pepper, sliced
- Parmesan cheese for sprinkling at the end (optional)
Instructions
Butternut squash and stuffing
1. Preheat the oven to 200C. Cut the butternut squash in half (you may need to microwave it for a minute or two in order to be able to do this) and scoop out the seeds.
2. Place both halves on the baking tray, drizzle with a little olive oil and season with salt, pepper and dried oregano. Cook for 40 minutes. Take out of the oven, add the chopped peppers and tomatoes to the tray and cook for another 10 minutes.
3. Meanwhile, mix the quinoa with the carrots, onions and dressing (see instructions below).
4. Take the tray out of the oven and transfer the peppers and tomatoes to the stuffing mix.
5. Stir together and spoon the filling into the butternut squash. You can also scoop out some of the squash and mix it in with the stuffing before adding the stuffing to the squahs. Return to the oven for 10 minutes.
6. Sprinkle some parmesan cheese on top (optional) and serve.
Dressing
1. Pour the juice of one lemon into a cup.
2. Add enough olive oil that it is about equal to the amount of lemon juice.
3. Crush 2 garlic cloves and mix into the lemon/olive oil mix.
4. Add some salt to taste.
Thanksgiving & Pumpkin Pie
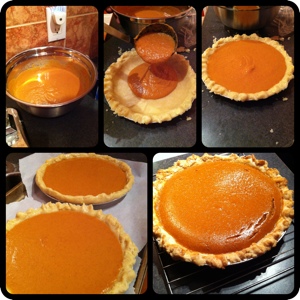
Happy Thanksgiving everyone! How was your week-end? J and I had a lovely couple of days relaxing here in Halifax. This was probably the first time ever that we spent a long week-end and home, so it was definitely different for us, but really nice. It felt like all of a sudden, time was nicely wrapped up and handed to me as a gift – it made me realise how much of our long week-ends we normally spend on the plane or in the car. So, with our nicely wrapped time, we did a hot yoga class together on Friday (J’s first! He survived and loved it!), and we also went shopping and out for dinner here on Saturday. On Sunday, we combined our efforts to make our first ever pumpkin pie and it turned out delicious!
I was going to just share the pictures with you, but then I thought it wouldn’t be very nice to do that without sharing the recipe, so here you go!
Martha Stewart’s Pumpkin Pie
The original recipe said that this recipe would yield one 9-inch pie, but we were able to make 2.
Ingredients:
1 cup packed light-brown sugar
1 tablespoon cornstarch
1/2 teaspoon salt
1 teaspoon ground ginger
1 teaspoon ground cinnamon
1/8 teaspoon ground cloves
1 1/2 cups fresh Pumpkin Puree Pumpkin Puree, or canned
3 large eggs, lightly beaten, plus 1 egg for glaze
1 1/2 cups evaporated milk
Pie Dough (we used this recipe)
1 tablespoon heavy cream
Directions
Preheat oven to 425 degrees. Line a baking sheet with parchment paper; set aside. In a large bowl, combine sugar, cornstarch, salt, ginger, cinnamon, cloves, pumpkin puree, and 3 eggs. Beat well. Add evaporated milk, and combine. Set aside.
Between two pieces of plastic wrap, roll the pie dough into a 12-inch circle. Fit pastry into a 9-inch glass pie plate; trim dough evenly along edge, leaving about a 1/2-inch overhang. Pinch to form a decorative edge. If the dough begins to soften, chill for 15 minutes.
Make the glaze: Beat the remaining egg, and combine with heavy cream. Brush glaze very lightly on edges of pie shell. Fill pie shell with pumpkin mixture. Transfer to prepared baking sheet.
Bake for 10 minutes. Reduce heat to 350 degrees and continue baking for 30 minutes more. Cool on a wire rack.
Source: Martha Stewart Living, November 2000
Happy Birthday B&B!
Though things have been extremely hectic on my end lately, I wanted to make sure that B&B’s first birthday didn’t go by unnoticed. Over the last year, B&B has been a place for me to share my thoughts, stories, recipes — and most recently, my sorrows. Thank you so much lovely readers for being there with me on this journey, and for supporting B&B with your comments and emails!
Funnily enough, a couple of days before B&B’s birthday, I received a text message from my friend Dina saying “I am making baklava tomorrow, want to come over and babble?”. I could not help but laugh to myself, but also thought – what better way to celebrate B&B’s birthday! So..off to Dina’s I went, and babble and baklava we did. In honour of this very special occasion, I have a tried and tested baklava recipe for you. Make sure to make it in the company of good friends so that you too can babble & baklava! Special thanks to Dina over at thispassinglife and to Step by Step Baking (Caroline Bretherton) from whom the recipe was adapted.
Ingredients:
Enjoy!
The best brunch dish ever
So, I am not one to use superlatives very often. In fact, they’ve always kind of scared me. When I was in grade school and my teachers used to ask us to pull out our “best” handwriting, I would always get a bit anxious and worried that I would have used up my limited supply of “best hand writing” by the age of 9. I would get a similar feeling when people would ask me what my “favorite” song, or “favorite” colour was. I always felt that if I gave a song name or a colour out, than that song or colour would have to be my favorite for the rest of my life. At 29, I still sometimes experience anxiety over these sorts of things.
Having admitted this publicly on my blog, I must also say that once in a while (but very rarely), I can use a superlative sans anxiety. For example, there is this red curry chicken soup at this Thai restaurant in Ottawa which my friend and I have qualified as “the best soup in the world”. A few years later, I still sleep well and have no regrets about having used this title. So today friends, let me introduce you to “the best brunch dish ever”. I hope you will find it as delicious as I have. This dish is great for serving to guests, and is also extra awesome because you can prepare it the night before.
Overnight Proscuitto & Feta Egg Bake
*Note: The original recipe calls for goat cheese, but I have substituted feta cheese instead.
Ingredients:
-14 to 18 slices English muffin bread
-6 oz. prosciutto, thinly sliced and torn into bite size pieces
-8 oz. crumbled feta cheese (or goat cheese if you prefer)
-8 oz. shredded provolone cheese
-1/4 c. chopped green onions
-6 T. thinly sliced fresh basil
-5 large eggs
-2 c. whole milk
-1 T. Dijon mustard (optional)
-1/2 tsp. salt (you may want to use less, depending on the saltiness of your prosciutto/ham and goat cheese)
-1/2 tsp. ground black pepper
3 T. unsalted butter, melted
Preparation:
Spray a 9″ x 13″ baking dish with cooking spray. Then line the bottom of the dish with 1 layer of bread, cutting some of the slices to fit if necessary. Arrange half the prosciutto evenly over the bread, and then half the goat cheese and half the provolone. Sprinkle with half of the green onions and basil. Top with a second layer of bread slices. Layer on the remaining prosciutto, goat cheese, provolone, green onions, and basil.
Whisk eggs, milk, mustard, salt, and pepper in a medium bowl. Pour egg mixture evenly over the egg bake, letting it soak in. Drizzle melted butter evenly over the top. Cover and refrigerate overnight.
The next morning, preheat oven to 350°. Uncover the egg bake and let stand at room temperature for 30 minutes. Bake until the center is set, about 55 to 60 minutes. If you want to crisp up the top even more, set it under the broiler for a minute or two, until golden. Cut into large squares and serve.
Yield: 6 to 12 servings
Source: adapted from the recipe box of Meghan Cornell, adapted from Bon Appetit ”Entertaining Made Easy”, December 2003, also seen at http://www.afarmgirlsdabbles.com/)
Lemon, Sumac & Turmeric Roasted Cauliflower
I really like cauliflower but until a few days ago I couldn’t really say that I had a ‘go-to’ cauliflower recipe. I sometimes throw it into salads and last year I made a really good Thai red curry chicken soup with it, but other than that, nothing special sticks out in my mind.
I recently came across this recipe and wanted to try it right away. Having run out of cumin a few days earlier, I decided to experiment with turmeric. I was pleasantly surprised with how well the lemon, turmeric and sumac flavours blended together. The result a deliciously tart yet warm roasted cauliflower dish. I think you will enjoy. Here is the recipe, which is a slightly modified version of the one I mentioned above, replacing only the cumin with turmeric. Enjoy!
Lemon, sumac & turmeric roasted cauliflower
I large head of cauliflower, broken into florets
1/3 c olive oil
1 large lemon, zested & juiced
1 T ground cumin
1 T ground sumac
1 t garlic powder
1 large pinch kosher salt
good grind fresh black pepper
additional lemon, quartered (optional)
Preheat oven to 425F.
In a large bowl, combine the cauliflower, olive oil, lemon juice and zest, cumin, sumac and garlic powder. Toss with your hands or a wooden spoon so that everything gets evenly combined. Dump onto a cookie sheet prepped with a silpat mat or parchment paper and sprinkle with salt and pepper. Bake for 30 minutes, flipping cauliflower over at the 15 minute mark. When everything is golden brown and crispy, remove from oven. Serve with additional lemon quarters for that added lemony bite.
An autumn twist on cobb salad

J and I have been making an effort lately to try to buy as much ‘in-season’ produce as possible. I recently picked up some red cabbage and have been incorporating it into a few different dishes.
My most recent concoction is what I like to call an autumn twist on a cobb salad. You’ve got your lettuce, sharp cheddar cheese and boiled egg, but I’ve mixed it up with some pomegranate, red cabbage and avocado. This combination of flavours is delightful and I love how all the colours look together! I dressed with cranberry pear balsamic vinegar with olive oil, which I picked up at this really cute store called Liquid Gold. Try it out and let me know what you think!


